Showing posts with label TwinkleStar. Show all posts

Thursday, November 28, 2013

Logos by TwinkleStar's Graphics

Logos by TwinkleStar's Graphics

Here are some logo designs designed by TwinkleStar's Graphics. Some of these Logos are open for sale. contact TwinkleStar's Graphics Hope You like it.

1.
...

...

2.
...

...

3.
...

...

4.
...

...

5.
...

...

6.
...

...

7.
...

...

8.
...

...

9.
...

...

10.
...

...

Wednesday, November 20, 2013

Tutorial 5 - How to make Urdu Wallpapers


Hi!
In this tutorial I'll tell you how to add Urdu in your photos and make Wallpapers with Urdu text.
To add urdu in photos, you have to Install a software named "Inpage Urdu". You can download Inpage Urdu Software From Here...
After Installation of Inpage you can write urdu text and you've to copy the urdu image into photoshop... Follow the tutorial...
Here we go Step by step.

Lets Start:

In this tutorial I'll tell you to make this..


Step 1:

First of all open the "Inpage Urdu" and create NEW..


Step 2:

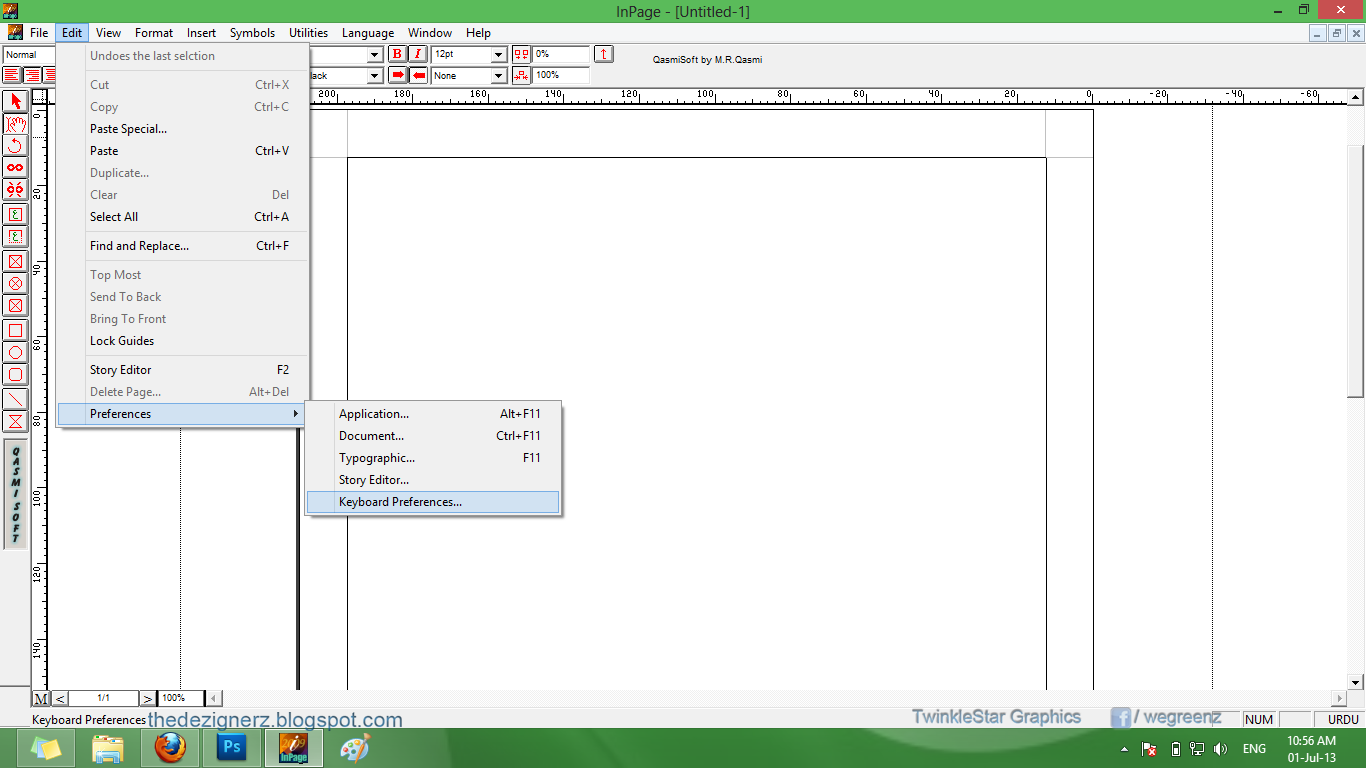
now you have to make some settings(If you installed Inpage for 1st time).  Go to Edit>Preference>KeyboardPreference. As shown in the Figure.


Step 3:

Now change the Keyboard to "Phonetic". Phoetic keyboard is easy to write urdu.
Like in Phonetic "A" is "Alif", B is "Bay", C is "Chay".... and so on.
right under the keyboard selection there is a button (in version Inpage 2009 and less) . if you click there is all keyboard shown all the keys and functions . (Must Check).


Step 4:

Now write your text. and change the font color, Size and Font Style as your need.
In font Styles, I selected "Asaar" font. usually there is "Noori Nastaliq" the general urdu font.
If you want to write in fance font I'll suggest "Naskh", "Sulus", "Jameel" , "Diwani", "Noori Nastaliq" , "Dubai" , "Bombay Black".


Step 5:

Now when you done with your text. Click "File>Export Page".


Step 6:

In the Next windoe Click "Brows"(that window is not shown in the figure) the window in the Figure will shown. Now write the name of file.
Never remember to change the option to "Encapsulate Post Script files".
As shown in the Figure.


Step 7:

Now Open the "Adobe Photoshop". open the EPS file which was exported. or Drag the file in Photoshop. this option will appear. click OK.


Step 8:

This will be the output.


Step 9:

Create New file and add the effects as your need. Like in the figure I am adding gradient. ( You can see the use of gradient in previous tutorials of this blog). Check the highlighted areas in Figure


Step 10:

Now Select the cursor tool from toolbar and drag the urdu text to your new image. (You can do the same by Copy & Paste).


Step 11:

Now Select the Urdu text Layer. Right Click on it and Select "Blending Options" 2nd option in the list.
After this Select "Color Overlay" and select the color which you want.
important areas are highlighted in the figure.


Step 12:

Your Image will look Like this.


Step 13:

In this step I added a vector image under the "Urdu" layer. You can add the graphics as per the need of your design.


Step 14:

Here is the Final Image..


You can do better than this..
I've made some of the designs using the same technique and Inpage Urdu.

Or this...
Related Posts Plugin for WordPress, Blogger...

Tutorial 4 - Play with Rainbow

Hi!
In this tutorial I'll tell you how to make rainbow and its variations using "Gradient tool". With Gradient and some simple tools you can do amazing things.
Here we go Step by step.

Lets Start:

You can make this, even more better.


Step 1:

First select Selection tool from toolbar and draw a rectangle same as shown in the figure.


Step 2:

Select Gradient tool, Draw Gradient like in the image. (You can see the use of Gradient tool in previous Tutorial#3).


Step 3:

Same as previous step do this as many times as much colors you want. Like I did in the figure.


Step 4:

Now select all the Gradients with tool shown in the figure.


Step 5:

Drag all the colors to the next blank "Landscape" page. (See Next Step).


Step 6:

Rotate as you wish.


Step 7:

Now select to Edit>Transform>Warp. 


Step 8:

You can select the effects like shown in the image. I selected Arc.
Or you can manually do any thing after selecting "Warp".


Step 9:

Here I selected "Flag" from Warp, drop down menu.


Step 10:

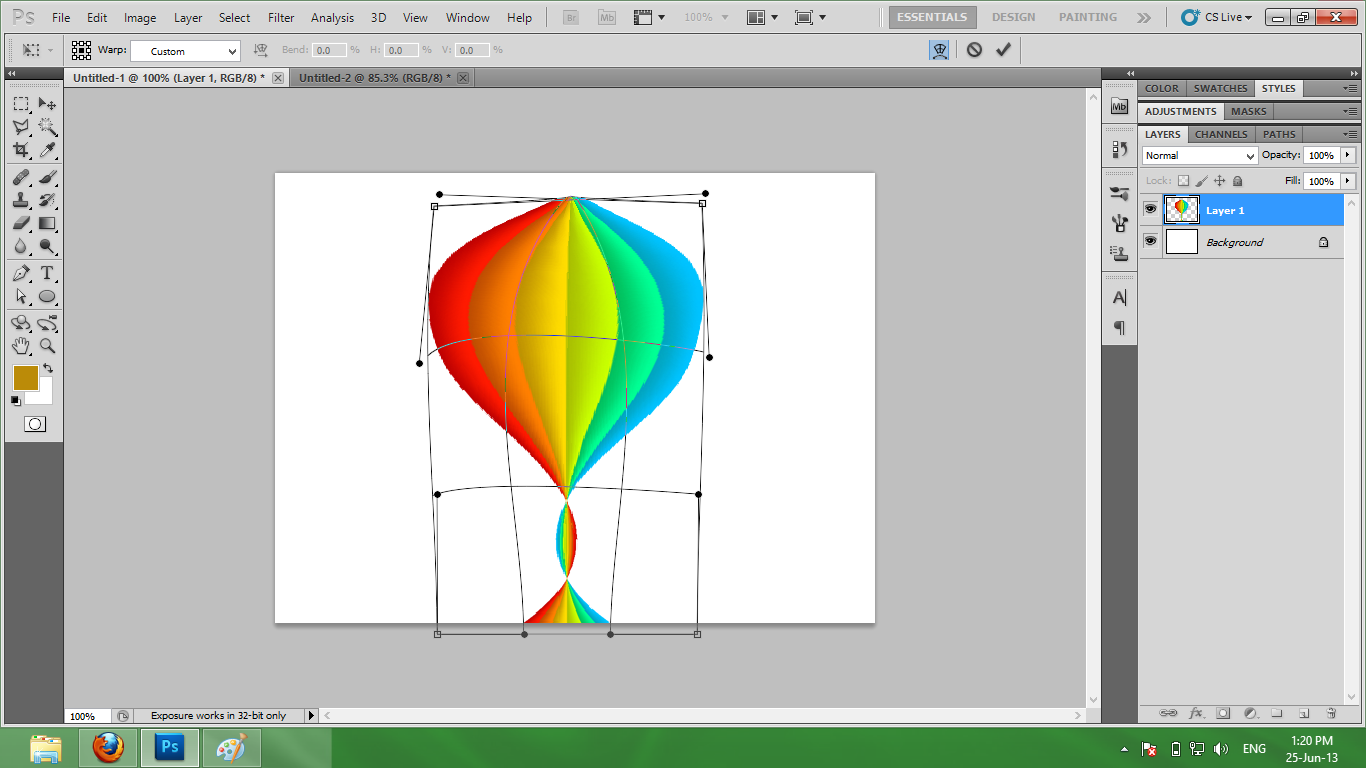
Now I am going to make Balloon.
I selected "Fish" from warp drop down menu


Step 11:

Change the dimension little bit as your need, manually.


Step 12:

I removed the extra thing, and made a box and lines under the balloon.


You are here...
Hope it will help You..
Good Luck.
Related Posts Plugin for WordPress, Blogger...

Tutorial 2 - Makeup

Hi!
In this tutorial I'll tell you how to makeup your photo. With the help of this tutorial you can change your without makeup, awkward looking photos to a beautiful and charming ones. and at all it'll reduce your makeup cost and will help to find a "Acha Rishta", seriously.
After this tutorial you will realize that how important Photoshop is for "Rishtaa,s" and it is more important than "Rishte wali Maasi".
Oh sorry,
Here we go Step by step.


Lets Start:

We are going to make this photo.


Step 1:

First Open a photo in Photoshop. select zoom tool from toolbar( or click "Z"). Then right click on photo and click on "Fit on Screen". This will be your background Image.


Step 2:

Select "Eclipse Tool" from toolbar. as shown in the image below.


Step 3:

Now Select Pink color from color Picker. you can open "Color Picker" from Toolbar left.


Step 4:

Now make the circles on cheeks using "Eclipse Tool". as shown in the image.


Step 5:

Now select the both layers, right click there and select "Merge Layers". now this will be Merged in one layer.


Step 6:

From the Filter Menu from top, Select Filter>Blur>Gaussian Blur.


Step 7:

Adjust this blur according to your image. like in this photo it is on 8.0.


Step 8:

Now according to your need change or less the opacity of this layer.


Step 9:

Now create a new layer. in bottom right corner there is an option "create a new layer". Make sure that new blank layer is selected. and then select "Eclipse Tool".


Step 10:

Now rename that layer and keep (drag) it under the 1st Pink Layer. as shown in the image.


Step 11:

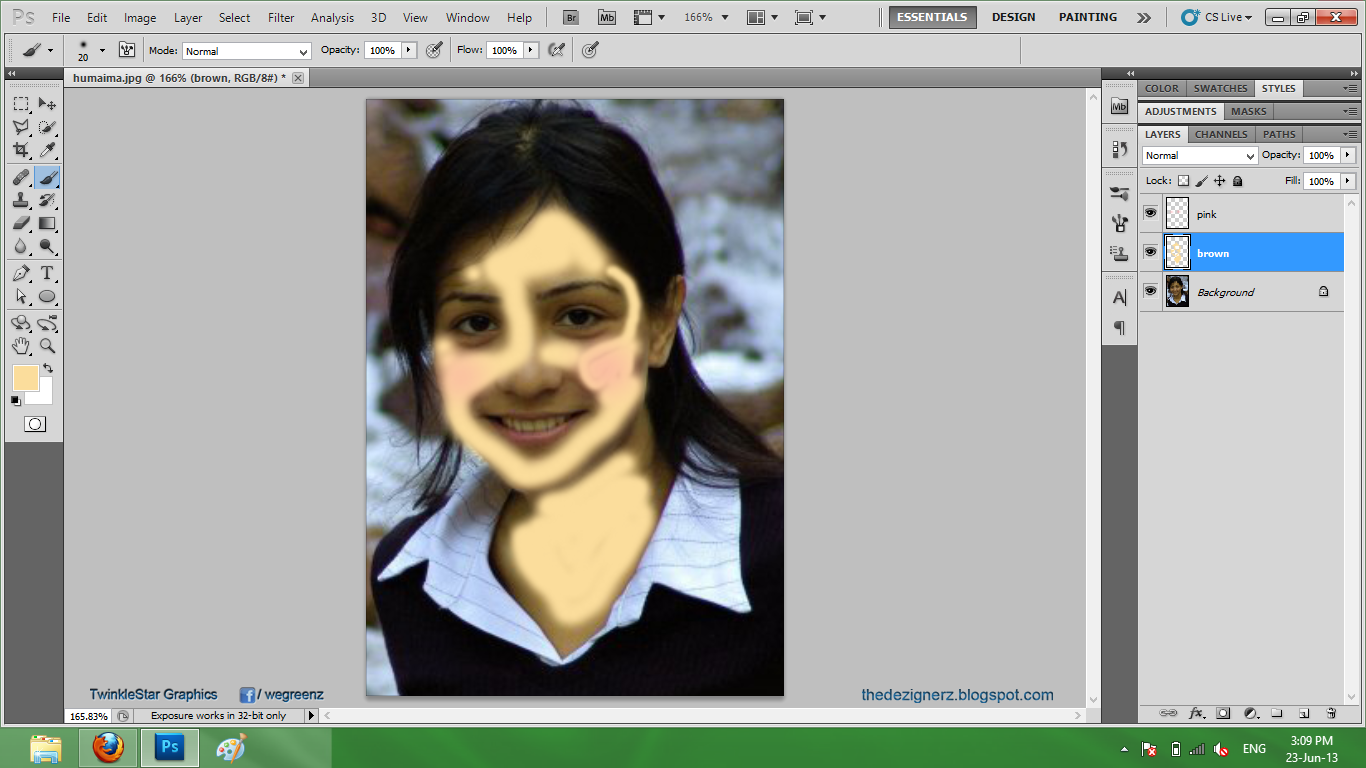
Make sure that the new layer named "Brown" is selected. Then Select the brush tool from toolbar. or (click "B").


Step 12:

Select Light Brown color from Color Picker.


Step 13:

Now brush the layer exact on the skin. dont go out of the skin, just like shown in the image. because after blur its color will spread all over.


Step 14:

Now again do the "Gaussian Blur" as above. Filter>Blur>Gaussian Blur. Dont blur it too much. just do it like in the image below.


Step 15:

Now Change the "Opacity" of the layer to minimum as you wish. The option is at the top of layer.


Step 16:

Now come to eyes. I am not showing the whole process again. First make a new blank layer. then just paint the black marks on eyes using brush, like done in the image.Then again a little "Gaussian Blur" and "Opacity".


Step 17:

Now come to the Lips (of photo actually).
Zoom.
Select "Lasso Tool". Select the exact lips area using the tool.
Then for upper Lip. Press and Hold the Shift key and select the area using tool.


Step 18:

Now change color.
First Select the Background Image layer (Bottom Layer).
Go to Image at the top Menu. then
Image>Adjustment>Color Balance.
the color balance window will open. like in the image. Change the color as you need in your photo.


Step 19:

This is final. Just select Blur tool from Toolbar, as shown in image below. apply a little blur on the corner of the lips area so that the sharpness of edge reduced to original.

Step 20:

You are Done.
Here is Final Image

Good Luck...